1. Login in www.gmail.com
2. Click the settings> Forwarding and POP/IMAP
2. Click the settings> Forwarding and
 POP/IMAP
3. Select Enable POP only for mail that arrives from now on and click on Save Changes button.
4. Now logout www.gmail.com
5. Open Outlook.
6. Click the Tools menu, and select Account Settings...
7. On the E-mail tab, click New...
8. If you are prompted to Choose E-mail Service, select Microsoft Exchange, POP3, IMAP, or HTTP, and click Next.
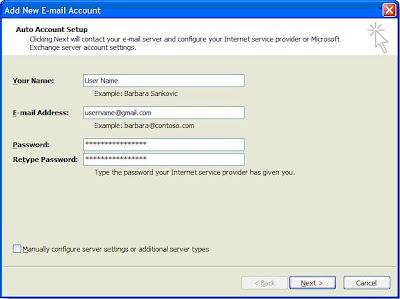
9. Fill in all necessary fields to include the following information:
Your Name: Enter your name as you would like it to appear in the From: field of outgoing messages.
Your Name: Enter your name as you would like it to appear in the From: field of outgoing messages.
Email Address: Enter your full Gmail email address (username@gmail.com). Google Apps users, enter your full address in the format username@your_domain.com.
Password: Enter your email password.
Manually configure server settings or additional server types: Leave this option unchecked if you want to automatically configure Outlook 2007. If you want to manually configure Outlook 2007, check this box now. Google Apps users should configure manually as follows

10. Click Next. If you are configuring Outlook 2007 automatically, you're done! Just click Finish.

11. If you are configuring Outlook 2007 manually, select Internet E-mail and click Next.
12. Verify your User Information, and enter the following additional information:
12. Verify your User Information, and enter the following additional information:
Server Information
Account Type: POP3
Incoming mail server: pop.gmail.com (Google Apps users, enter the server names provided, don't add your domain name in these steps)
Outgoing mail server (SMTP): smtp.gmail.com
Account Type: POP3
Incoming mail server: pop.gmail.com (Google Apps users, enter the server names provided, don't add your domain name in these steps)
Outgoing mail server (SMTP): smtp.gmail.com
Logon Information
User Name: Enter your Gmail username (including @gmail.com). Google Apps users, enter your full address in the format username@your_domain.com
Password: Enter your email password.
Require logon using Secure Password Authentication (SPA): Leave this option unchecked.
User Name: Enter your Gmail username (including @gmail.com). Google Apps users, enter your full address in the format username@your_domain.com
Password: Enter your email password.
Require logon using Secure Password Authentication (SPA): Leave this option unchecked.

13. Click the More Settings... button, and select the Outgoing Server tab.
14. Check the box next to My outgoing server (SMTP) requires authentication and select Use same settings as my incoming mail server.

15. Click the Advanced tab, and check the box next to This server requires an encrypted connection (SSL) under Incoming Server (POP3). Enter 995 in the 'Incoming Server' box.
16. In the Outgoing server (SMTP) box, enter 587, and select TLS from the drop-down menu next to Use the following type of encrypted connection:

17. Click OK.
18. Click Test Account Settings... After receiving 'Congratulations! All tests completed successfully', click Close.
19. Click Next, and then click Finish.
Congratulations! You're done configuring your client to send and retrieve Gmail messages.
0 komentar:
Posting Komentar